| CAUTION! OBSERVING THE SUN IS DANGEROUS! OBSERVING THE SUN WITHOUT APPROPRIATE TECHNIQUES MAY HARM YOURSELF, CAUSING BLINDNESS AND/OR IRREVERSIBLE INJURIES! NEVER look at the Sun naked-eye! NEVER look at the Sun through an astronomical instrument nor any other (camera, etc)! NEVER look naked-eye or through any instrument and tool at a reddened and low-hanging Sun on the horizon whatever tempting this may be! To observe Sun, any time, anywhere, USE SAFE, DEDICATED TECHNIQUES! (see them below). BE AWARE that, despite the use of such techniques, danger may not be completely ruled out for the observer and for the instrument (see more at the description of the different techniques). DURING AN OBSERVATION SESSION, do not worry about your own safety only but about others' too. Never let instruments unattended, for example, especially when children are about; or brief about Sun observation's dangers people being there and not used to astronomy. It seems better not to use for usual Sun observation advices and techniques which are provided for observing the eclipses. see a dedicated page |
| Safe Observation Techniques | Solar Features, Observation Techniques |
Observing the Sun without any appropriate protection is dangerous because your eye is exposed to the strong intensity of sunlight and to the ultraviolet and infrared radiation of it which both are -silently- harmful to the retina. Appropriate techniques for the observation of the Sun thus has to protect the observer against such three components of sunlight! The most recent trend in solar observation, on a other hand, is to go beyond the visual observation of the photosphere, there where sunspots are seen, towards the activity of the chromosphere, the realm of erupting prominences. This trend however is requesting advanced, high-cost tools, as the visual techniques are remaining an usual way of looking at the Sun. It's these techniques which are described here
The users of H-alpha filters or telescopes may want to turn to the section dedicated to solar filters, below. In any case, avoid last minute experimentations in terms of the techniques chosen for solar observation and make some trials before!
->Warning! You will note that some manufacturers advice against the use of such or such telescopes with such or such techniques. check your telescope manual, and/or manufacturer for further instructions!
->Warning! No matter what recommended technique you use, do not stare continuously at the Sun. Take breaks and give your eyes a rest!
| The Projection Technique Appropriate Solar Filters | Sun With Binoculars Naked-Eye Observation |
Even if the projection technique, which consists to use a telescope to project a Sun's image onto a screen, is widely accepted in the amateur community, some limitations exist however. A general opinion is that this method is not to be used with closed tube instruments like refractors and with Schmidt-Cassegrain type reflectors (Schmidt-Cassegrain strictly, Schmidt-Newtonian, Maksutov-Cassegrain). Light beam may harm the instrument. Schmidt-Cassegrain are particularly sensitive as heat may harm the adhesive which maintains the secondary mirror. As far as Newtonians are concerned, the trouble is that the light beam is condensed by various optical parts, hence it may harm the telescope's various elements (the secondary mirror, for example) and thus the projection method must not be used, according to many to Newtons. Some advices are that Newtonians may be used with the projection method, provided a reducing cap is used. A reducing cap is a cap bearing a hole. It's placed at the instrument's entrance, where it's reducing the aperture. The hole usually is shifted relative to the cap's center to avoid the secondary mirror's obstruction. Another opinion is to use a reducing cap with any allowed instrument having an aperture above 3". As far as eyepieces are concerned, first use ones providing a low magnification. On another hand use eyepieces, elements of which are not glued. Best to use are Huygens or Ramsden types eyepieces. Most current eyepieces found today having glued elements, the only solution is to reduce the aperture of the instrument. Generally, you will have, as far as refractors are concerned, to chose by yourself whether to use them, or not, with the projection technique. The cost of your instrument, or its use for nighttime observation will certainly be factors. Some ready-to-use, simplified, "solarscopes", or similar devices, using the projection technique, are found on the market
The projection method seems the safest as, at no time during the session, the observer's eye is in line with the Sun. A basic system which is often described is a device, at a refractor's back, which, starting at the tube or focuser, bears a screen at some distance from the eyepiece. The Sun's image is projected on the screen. Another screen, found at the instrument, is shading the projecting screen, improving the contrast. A device holding a paper sheet or any other tool allowing an observation report, may be fitted to such a screen -see below at "Observation Techniques"). Such a projecting device may be availabe on the market or may be home-built, or adapted to reflectors
Use a sufficient length between the eyepiece and the projecting screen to avoid a too bright projected image. If your instrument has a finder, put its cap on the latter or just remove the finder. Always aim the instrument with your back to the Sun, using the telescope's shadow as an aid. Maintained a continuous state of awareness all along the session as you may have a tendency to inadvertently look to the Sun. Think about that condensed heat may yield burns or set fire on objects at the eyepiece's exit. Eyepieces with a metal casing may be highly heated by projection method! Do not touch them! Take care of projecting far away enough to weaken the brightness the projected image
Appropriate solar filters come into two types. Ones, composed of miscellaneous material, which are mounted on a mount (those are expensive filters). The others, which are made of a thin, aluminized metal sheet and to be mounted by yourself. Both types, in any case, are to be used at the aperture of your astronomical telescope -there where the light first comes in! Such filters are to be bought at telescopes, or -some- general optics retailers. The image of the Sun obtained through such filters vary in terms of colors and are best suited to such or such objects at the solar surface. Despite the fact that such tools may somehow be considered safe, they are not completely so. Usual advices are to check, for any defect or damage affecting the filter before any use, and to observe by short episodes only, looking through the eyepiece only very briefly to avoid eye damage. In any case, when using some kind of appropriate solar filter, check its cons and pros with your dealer! One view is that the best solar filter in film, which outdoes the Mylar, is the Astrosolar filter by Baader as it is sold like a sheet and the observer has to make a fastener -like a cardboard ring- by himself to set the filter at the aperture. Note that that brand is warning that such their type of solar filter, according to current scientific knowledge, might not protect against a type of eye damage called 'phototoxic reactions,' albeit their filter is protecting against 'photocoagulation,' or thermal damage to retina or that they never knew of any trouble due to the use of their filter sheet and that in case of doubt, especially with observers already affected by some excessive eye sensibility, it is better to meet with a ocularist or optician. Some source specify that 1/10000th Mylar filters are letting a residual ultraviolet radiation in and thus that a UV filter has to be used too; other sources further may specify other precisions. SO. CAUTION NEEDED! And just ponder the pros and cons before using any type of solar filter. As filters are rejecting any heat from the instrument, any type of instrument and eyepiece may be used. Think to put its cap to the finder however, or to take it away! Further, aim your telescope using the instrument's shadow only! Note too that it's seems better to use a star-diagonal when observing the Sun using a filter, as, in another way, your non-observing eye may come at risk if you observe along the line of sight of the teslecope! AT LAST, you have to check that the filter is solidly and securely fixed at the instrument's entrance, so no movement nor a wind gust, will take it out!
An additional care is to be taken relative to a variety of filters which you SCREW at the EYEPIECE'S BOTTOM. NEVER USE SUCH FILTERS! They are dangerous Heat splits them, as light passes instantaneously, presenting an obvious danger
As far as the projection method is concerned you will have to decide by yourself about any possible damages to your binoculars (see considerations above about the projection method) A good system is to use a tripod and a screening screen. One of the objectives is to be kept capped. Making short observational periods only is a good idea to keep any optical part of your binoculars to get too much heated. Advices and safe practices described above apply, see them!. As far as appropriate filters as concerned, already mentioned safe appropriate filters of both types may be used with binoculars. Just place the filters over the two main objectives. Advices and safe practices described above for appropriate filters apply, check at them!
THE ONLY SAFE WAY to look at the Sun naked-eye is to use a welding glass, shade 12, which is to be found at opticians shops or welding supply ones. You may also use for a visual observation any type of a dedicated solar filter for instrument. All the other types of filters, especially those home-made, like CD-roms, film negative, medical radiographies MOSTLY ARE NOT safe as most consider them unsafe. Don't use them without further information. Some details may be found at Sky & Telescope, for example. As far as dedicated solar eclipse glasses manufactured and spread at the occasion of a solar eclipse are concerned, it looks like you may also use them for the observation of the Sun as, for example, you may use them to observe a Venus transit. For more safety however, get more information from the professional retailer who will sell them to you. Such dedicated glasses, generally, come with a limit date of use, which has to be respected. AT LAST, let's call your attention against looking at a low-hanging and/or reddened Sun. Even if it is tempting, don't! Even low on the horizon, and/or reddened, the Sun is as dangerous as a plain Sun!
As far as the question of using a welding glass in conjunction with a instrument or binoculars, most sources warn not to do as the magnifying power of those will amplify the sunlight beyond the filtering power of the glass! One brand of a solar aluminized metal sheet however to use with a instrument states that the protection afforded is equivalent to that of a shade-12 welding glass, which implies a welding glass may be used in such conditions. That brand however is further warning that a welding glass, according to current scientific knowledge, might not protect against a type of eye damage called 'phototoxic reactions,' albeit their filter is protecting against 'photocoagulation,' or thermal damage to retina (check more above)
| Solar Features | Observation Techniques |
By 800 B.C. ancient Chinese astronomers recorded the first observations of sunspots in the I Ching, the Book of Changes. By the early 17th century, Galileo first used a telescope to observe the Sun as Johannes Kepler hypothesized a solar wind as the Maunder Minimum until 1715 -- a decrease in solar activity -- brought less sunspots. The theory of a sunspot cycle was first postulated by German astronomer Samuel Heinrich Schwabe about 1843, who was looking for hypothesized, undiscovered planet inside Mercury's orbit; he also watched sunspots which could misleading and discovered a cycle he first estimated at 10 years only. Solar magnetism and solar magnetic 22-year reversal was discovered by U.S. astronomer George E. Hale by about 1908 from the disruption of spectral lines near a sunspot. The coronograph, a way to mimic a solar eclipse, was invented in 1931 by French astronomer Bernard Lyot, allowing to the study of the corona. The solar observation by professionals nowadays mostly is directed towards the study of the energetic events of the Sun which may be affecting the orbiting satellites or power grids and other terrestrial activities. The theoretical observation of the Sun pro se still remains of interest, as the simple observation of the Sun's sunspots remains a fine activity, allowing to understand that main, visible Sun
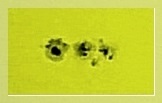 | sunspots as observed with a small amateur telescope! picture site 'Amateur Astronomy' |
->A Quick Overview of Solar Activity.
Sunspots seen at Sun' surface are places of intense magnetic fields. Such fields, there, are blocking the escape of the solar plasma, the electrically charged gas of the Sun. When the pressure becomes too large, the magnetic fields above the sunspots burst. When the burst occurs near the surface, it's a solar flare, a radiation event only (UV, X-rays, high-energy particles). When the magnetic field has been stretched into the solar corona, it's a Coronal Mass Ejection (CME) outpouring billions tons of solar material into the solar system. for more theory about Sun see the tutorial "Sun"
![]() check some illustrations of solar features and activity as seen in varied wavelengths, visual light excepted (albeit not in visual light, such pictures will help you deciphering pictures you may found at solar satellites websites, or to better understand the main solar mechanisms!)
check some illustrations of solar features and activity as seen in varied wavelengths, visual light excepted (albeit not in visual light, such pictures will help you deciphering pictures you may found at solar satellites websites, or to better understand the main solar mechanisms!)
Photosphere is the Sun's outermost and main amateur-accessible layer. First thing first: sunspots. Sunspots are these features appearing like dark spots on the Sun's surface. Sunspots are regions, temperature of which (7100° F) is weaker than their surroundings, hence looking darker. Sunspots are magnetic regions where magnetic fields are thought to prevent the heat coming from below to reach the surface. The solar plasma is thus becoming cooler, hence heavier, and it sinks (at a speed of 3,000 mph). The sinking phenomenon holds magnetic lines of same polarity together. Solar sunspots often are working in pairs, each sunspot marking one foot of a magnetic loop, and having one polarity, either positive or negative, as a same-polarity magnetic fields found in a same sunspot would tear it apart. A sunspot has a dark area -the "umbra" and a less dark one surrounding the previous -the "penumbra". Sunspots may be isolated but they are often gathered into groups. Such groups are made of one important sunspot, with associated smaller sunspots; or of a pair of sunspots and smaller spots and pores in arc or line. Such groups are called "active regions". They are evolving. When two sunspots are concerned, the eastern sunspot is the first to disappear, as the western one becomes smaller, and rounder, being able to last sometimes for weeks. Generally, sunspots may last from hours to months (for the larger ones), with a average of two weeks (before they start to fade or rotate out of view). As Sun is rotating, an interesting amateur observation activity is to watch the sunspots transiting the Sun's disk
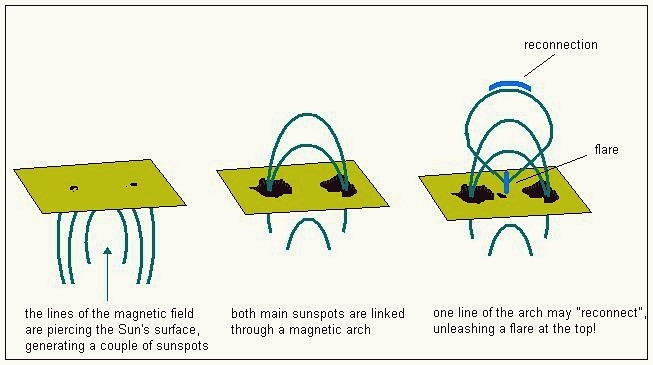 | click to another view of how sunspots form. site 'Amateur Astronomy' |
Other objects are seen on the Sun's disk: faculae, granules, and pores. Faculae are bright zones. They are observed close to the Sun's limb most of the time. Faculae are regions of magnetic activity too. They are mostly the mark that there was once a sunspot group there. When they are seen on the eastern limb of the Sun, they may herald sunspots emerging from the Sun far side. Granules are features which cover the solar disk. They are the top of Sun's convection cells. Convection cells are part of the convective motion, which is the Sun's last inner layer before the surface. This convective motion is bringing outwards the energy which is created at Sun's core. Granules are cell-shaped zones, 620-mile (1,000 km) wide. They are not easily observable as they are one or some arcseconds wide only. Their lifetime is short, at about 20 minutes only. Late studies are showing that granules are pillow-shaped, as faculae are interestingly seen as accumulation of magnetic fields against the granules' walls (hence the explanation why faculae are best seen near the solar limb: granules' walls are then seen obliquely! At the center of the solar disk, at the opposite, faculae are seen from above). Pores, at last, are small features which may appear and disappear in a few minutes, or they may develop into sunspots. Pores are about 2 arcseconds wide. A general, visual feature of the solar disk is that the luminosity is decreasing at Sun's limb, giving solar views a finely rendered spherical aspect. This feature is called the "limb darkening". Limb darkening is that the center of the Sun is a bit brighter than its edges which is attributed to the observer's line of sight with the edges showing the upper, cooler and dimmer visible solar surface (the upper photosphere) as a direct sight shows the hotter and brighter base of it
A recent trend in solar observation is the use of H-alpha filters or of H-alpha dedicated telescopes, which are allowing to observe the chromosphere, a most dynamic region of the Sun, just above the photosphere. It's where features of the magnetic field, luminous plages around sunspots, dark filaments on the disk, prominences rising above the solar limb, or eruptions on the disk, may be observed. H-alpha filters are working by allowing just a narrow range, deep red, visible wavelengths to pass. This range is the emission of the hydrogen. The hydrogen is heated in the chromosphere due to temperature there being thrice the temperature in the photosphere. Hydrogen is turning red, hence the name of the layer: "chromosphere" (from the Greek "chromos", "color"). An obstacle to the development of such an observational trend is the important cost of such filters and instruments, although some of the latter type might now tend to become more accessible. Prominences and filaments are the same phenomenon. As they have a relatively low temperature (10,000-100,000° K) compared to the corona (about 1,500,000° K) they appear dark when seen on the solar disk, but are seen bright when seen on the dark background of sky. Dark filaments and prominences are magnetic, arch-shaped, tubes filled with hot gas holding hot, dense gas held aloft through solar magnetic force fields. Such filaments can occasionally collapse and explode. Plumes are seen rising from the prominence base, streams of plasma rain back down, and complex vortices are extant. When prominences erupt they may be seen producing tremendous bridges of incandescent material on the solar limb. More often, prominences remain aloft for day and even weeks, as they eventually sink gently back to the Sun. The larger prominences can last for several months! Important prominences are often associated with coronal mass ejections (CMEs). A filament can float sedately for days before disappearing and instead of raining back down it may escape out into space, which is a coronal mass ejection, or CME. The H-alpha filters are allowing too to see these white areas around sunsots which are called "plages". Other advanced tools, like coronographs which block the Sun's disk to allow to the Sun's atmosphere outermost layers -the "corona", seem to be accessible to advanced amateurs only too
Due to the high-cost of the tools used for the chromosphere, we are describing here the techniques used for visual observation only, once given some useful data for the observation of the photosphere
 | Sun's rotation observed Apr. 18-23, 2015! picture site 'Amateur Astronomy' |
The Sun mean rotation is lasting 27.275 days. The Sun's rotation is differential, that is that is that its rotation speed is different depending on the latitude. The rotation lasts 25 days at the equator as it lasts 30 days above 40° of latitude. The activity cycle of the Sun has been monitored regularly for around 250 years. Sun's rotation is called the "Carrington rotation" -from Richard Carrington who studied it ; Sun's rotations have been recorded since 1853. Since that date each rotation bears a Carrington number. Sun's axial tilt -its inclination relative to Earth's orbit plane (the ecliptic) or more precisely the angle of Sun axis relative to a perpendicular to the plane of the ecliptic- is 7.25° hence more of solar northern hemisphere is seen in September and of solar southern hemisphere in March. Records have been kept of the comings and goings of black spots in the Sun, on the other hand, since 1611 and the first use of telescopic intruments
Two official systems are giving the number of sunspots. This number may be useful to calibrate one's observations. The "Boulder Sunspot Number" -daily, found at the NOAA Space Environment Center- uses a 1848 formula by Rudolph Wolf. It gathers data from many observatories, and works like: R=k(10g+s), R being the sunspot number, g the number of sunspots groups, s the total number of individual sunspots of all the groups, k a scaling factor (usually <1) accounting for the the observation conditions and types of instruments. The "International Sunspot Number" -daily, Belgian, published by the Sunspot Index Data Center- is about 25% weaker than the previous. Generally, as a rule of thumb, number of individual sunspots visible on the Sun with projection method and a small telescope is approximately obtained dividing either of the index by 15. These index are found on diverse sites. Boulder Sunspot Number, is found daily at SpaceWeather.com). As far as our site is concerned, a page dedicated to the Sun is provided from the "Events, Moon, Planets" page
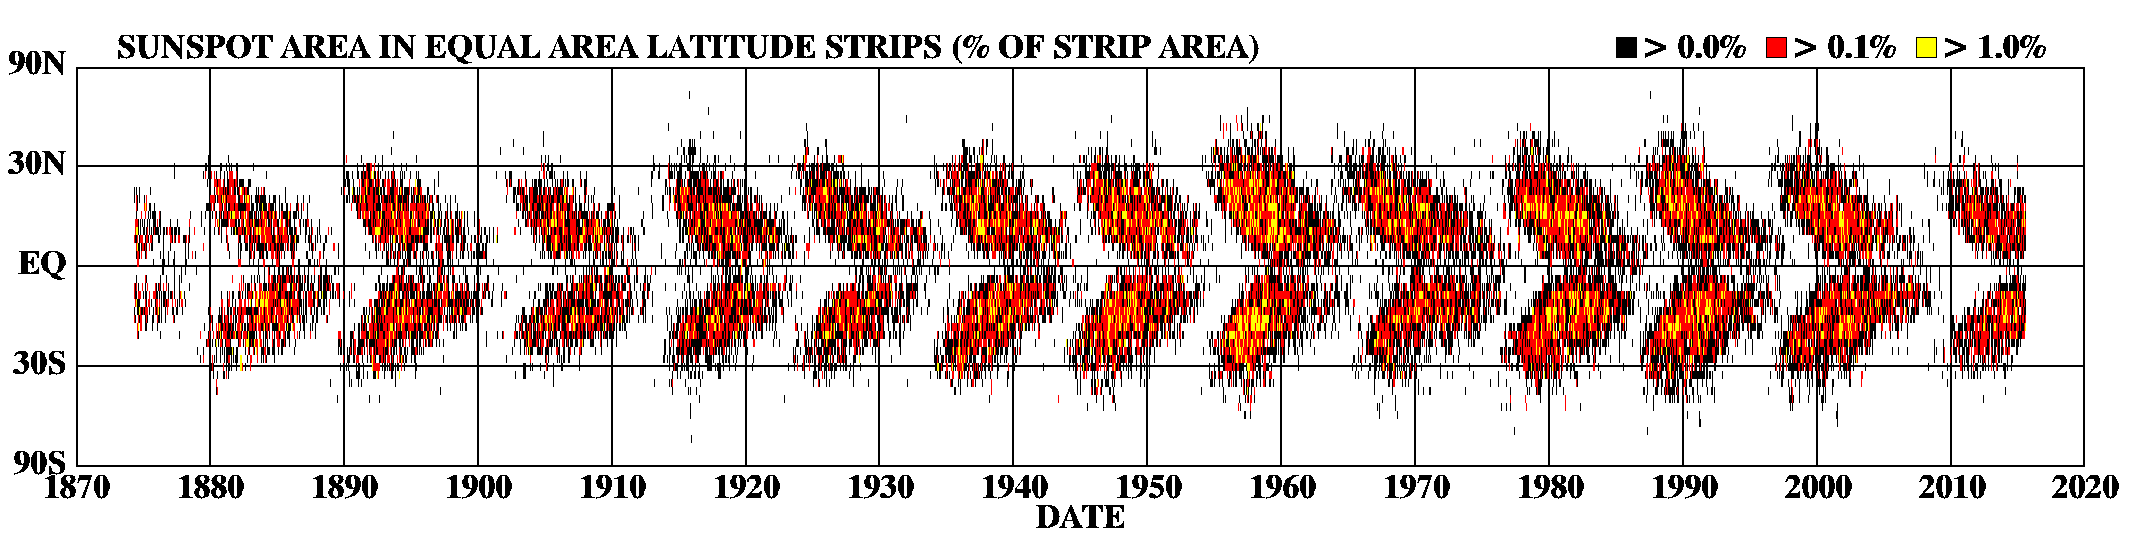
The solar activity is well-known to work on a 11-year cycle. When the cycle begins, the active regions appear at high latitudes in sparse numbers, disappearing after a few weeks or so. As the cycle proceeds, new and often larger active regions appear more frequently at successively lower latitudes. Many can be larger than Earth, and they sometimes persist for months. This activity takes place in both hemispheres simultaneously, and about five or six years into the cycle sunspots reach lower latitudes closer to the equator. This is known as solar maximum. After this, the number of spots begins to decline until they virtually disappear and the cycle starts again at high latitudes. The concept of solar cycle was discovered by German astronomer Heinrich Schwabe in the mid-1800's. The solar activity is increasing until a maximum, as sunspots and faculae are very numerous (sunspots are in the order of about 200 a month). Then activity is decreasing until a minimum, when few or no sunspots are seen (there are about a few dozen sunspots per month and days or weeks may go without any of them). At the solar cycle's beginning, sunspots are located at high latitudes. then, when the Sun progresses into the cycle, they appear at lower latitudes (this is called the "butterfly effect"). A solar cycle indeed can take anywhere from 10 to 13 years to complete as the amplitude of the cycle varies, with ome solar maxima very weak and others very strong. Sometimes double solar peak may occur, and considered a 'mini-cycle,' during about 2 years (with a first peak occurring, a drop and then a second peak). Another curiosity of the solar cycle is that the Sun's hemispheres do not always peak at the same time. In 2015 astronomers found a 330-day solar cycle with activity waxing and waning, looking like being driven by changes in bands of strong magnetic field that are present in each solar hemisphere. That explains the the Gnevyshev Gap, the fact that the number of powerful solar flares and CMEs peak a year or more after the maximum number of sunspots in the 11-year solar cycle. As one band is located North, the other South, they mix magnetic field from one into the other, bringing more sunspots, flares or CMEs. Both bands themselves undergo quasi-annual variations too in magnetism. Such bands may drags magnetic field from deep in the Sun. The band variation can dramatically destabilize the existing corona. for more about what is the current cycle, check our 'Last Sun' page!
| click to a view of the butterfly effect in terms of sunspots. picture courtesy NASA |
->More Advanced Views About the Solar Cycle
. the length actually varies in length between 9 and 14 years. Scientists still do not know exactly why
. the 11-year cycle might be linked to a system of two underground currents -or "Conveyor Belts", one in the northern hemisphere of the Sun, one in the southern, transporting magnetic field at depths -about 124,000 miles (200,000 km), from the pole to the equator, and back to the pole, near the surface. The Conveyor Belts perform one circuit in 40 years (with a variation possible between 30 and 50 years), at a speed of about 1 yard/sec (1m/s), as it drags the magnetic waste of sunspots towards the poles and down deep. The magnetic field of the Sun reincarnates the magnetic field of the sunspots, as they re-appear at the surface near the equator due to that they become buoyant. The belt's speed impacts the future sunspot cycles. When it's fast, this brings to an intense cycle. It's amazing to think that, say, sunspots you saw in 1986-1996 will be renewed and re-appear in 2010-2011! Intense cycles, on the other hand, unfold faster than the slow ones, with their first sunspots appearing early and the cycle's peak subsequently. The sunspots of the new solar cycle begin to appear when the underground jet streams reach the critical latitude of 22 degrees. The Sun's conveyor belt, also termed the Sun's 'Meridional Flow' from the equator to the poles in each
hemisphere carries magnetic remains of the sunspots to the poles. This produces
the streaks seen at higher latitudes and reverses the magnetic polarity of the
sun's poles every 11 years. The Meridional Flow rises to the surface at the Sun's equator and spreads out toward the poles
where it sinks back into the sun at a speed of usually 20 mph (32 km/h). Since 2004 the speed has been reaching 30 mph (48 km/h) and remained at that value since. It is of note to note that that faster pace occurred during the deepest solar
minimum in almost 100 years and indications that the next solar cycle will be a
weak one. This contradicts some theories that say a fast pace results in
increased sunspot production. But it agrees with others that say a fast pace
results in decreased sunspot production. A weaker activity at the Sun would have the temperature increase of
the Earth slow down, fewer auroras occurring, and less eventual disruption brought to satellites
. during a shorter than average cycle, currents move fast and pile up at pole. Such amplified fields yield a strong second-next cycle. On the other hand, for the first time since the end of the 19th century, the speed of the Conveyor Belts has been observed slowing to low levels never seen until now (that is 0.75 m/s in the North and 0.35 m/s in the South!). This allows too to predict what the second-next cycle will be
. because the Sun is rotating faster at the equator, the magnetic fields the Belts convoy, are getting tangled and wrapped at the moment when the circuit passes at the equator, packing the magnetic fields. This is the cause why the plasma, on its way back to the poles, is unleashing flares and CMEs. Any energy which is not dissipated this way and manages to reach back the poles, is providing the input for the next cycle. It takes to takes two solar cycles to fill that part of the underlying path between the poles and mid-latitudes with magnetic fields, and two more cycles to fill the part from there to the equator and back to mid-latitudes. All this brings that the Sun's cycle (that is mostly its magnetic strength) depends on these large-scale motions and that a solar cycle may depend on characteristics from as far back as 40 years
. a study in 2004 is hinting to a method which could allow to predict the minimum of the cycle. Solar physicist David Hathaway, from NASA's Marshall Space Flight Center, and colleague Bob Wilson think, based on the last 8 cycles, that the solar minimum is usually following by 34 months the first spotless day after the maximum. On the other hand, they found that, during the last cycles, the solar activity intensified rapidly after the minimum, bringing the next maximum to 4 years after the minimum only!
. as far as the next solar cycles are concerned, Solar Cycle 24 -the next to come, will begin with a rise in solar activity in late 2007 or early 2008 -that is about 1 year later than previously planned, with 30 to 50 percent more sunspots, flares, and CMEs in the cycle, as Solar Cycle 25, due to peak about 2022 will likely be one of the weakest in centuries! Every forecast method is hinting to that solar cycle 24 is going to be much potent, the method correlated the geomagnetic storm index at Earth with the strength of a solar cycle included. The strengh of this indice tells how the solar cycle is to be 6 or 8 years in the future, with a correlation of 94 percent. On that point too, solar cycle 24 is to be an important one, and maybe the most important since solar data began to be recorded, about 400 years ago. This cycle is due to peak in 2010 or 2011, with a sunspot number of 160 plus or minus 25. Note! The preceding passages about solar cycle 24 are to be voided as that cycle turned weak and maybe the weakest since long. check more at Last Sun)
Solar magnetic effects on Earth, like the auroras might reach their minimum 8 months only after a solar cycle's minimum. Factors might reside in the speed of the solar wind, and the strength and direction of the magnetic fields embedded within it or the interplanetery magnetic field (IMF). Coronal holes when not confined to the poles also contribute and increase the southward direction of the IMF hence its ability to connect with the Earth magnetosphere (IMF fluctuations are known like the Alfvén waves when emanating from the center of coronal holes). These three factors -low interplanetary magnetic field strength combined with slower solar wind speed and smaller magnetic fluctuations due to coronal hole placement- create the perfect environment for a geomagnetic minimum
Observing the Sun with solar filters is providing observer with best views of solar features as the projection method theoretically allows all features to be seen. It seems better fitted to sunspots disk transit however. Advanced amateurs with well-tuned projection system may accede to sunspots details as to photosphere's other elements like faculae
The usual observation technique used in conjunction with the projection method is to draw on the projection screen. A circle which fits the Sun projected image may be pre-drawn or printed and somehow affixed to screen. Another interesting idea may be too to photograph projected Sun's image or details of this image. As far as Sun coordinates are concerned amateurs have to know that they are depending about if sunspots' motion on solar disk or Sun's motion against background sky is considered. Relative to the background sky, the usage is to consider the Sun's North pointing to north celestial pole as its West (or "preceding" or "leading limb") is the part of the Sun facing the western horizon, there were the Sun is heading in its daily motion. East (or "trailing limb"), in this system is the Sun's part facing the eastern horizon, there from where Sun is moving away. As far as the motion of sunspots on the disk is concerned, Sun coordinates, in this case, are Sun's real coordinates, that is relative to its poles' axis, with an equator, longitudes and latitudes. Sun is rotating like Earth: eastwards as seen from above north pole
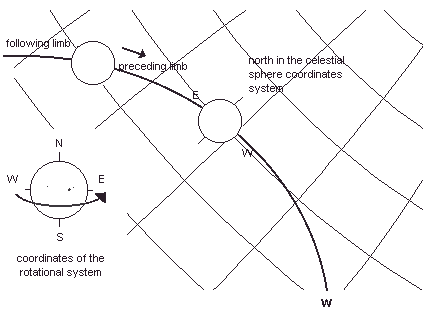 | click to a view of rotational and celestial East-West |
When observing with the projection method, usage is to use the Sun coordinate system relative to the background sky. Once solar image projected on the screen, a mark is drawn (e.g. a sunspot); the Sun's image is let drifting, and the same mark is spotted again. Just drawing a line between these two marks gives the East-West, or preceding-trailing limb axis. Perpendicular to it is the north-south axis. Where North and South are on the axis is determined by moving slightly the instrument's aperture side to the geographical north of the observer: the Sun is moving away from its northern limb, hence showing you where the Sun's North is
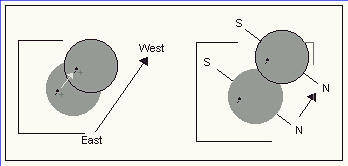
Once decided this first coordinates system, the second one is needed to compile the sunspots motion and to analyze Sun's rotation: Sun West-East is just decided considering a sunspot at an interval of two or three days. Better use two positions when the sunspot is about the solar disk's center, to avoid the distortion caused by Sun's limbs. The line you draw between the two sunspots' locations is the Sun West-East axis. A perpendicular is North-South
Observation using appropriate solar filters is alike -visually or photographically- to observing any planetary objects, hence you may practice about the same way
Website Manager: G. Guichard, site 'Amateur Astronomy,' http://stars5.6te.net. Page Editor: G. Guichard. last edited: 9/7/2017. contact us at ggwebsites@outlook.com